Wednesday, February 12, 2014
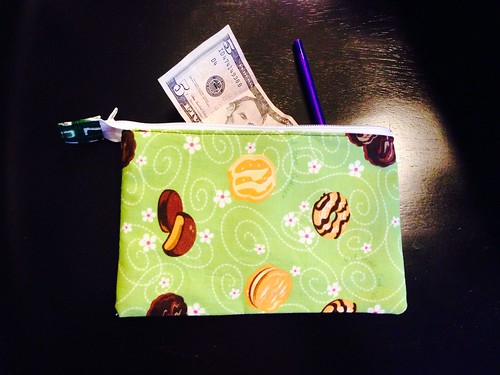
I made one a few years ago, but after two moves it seems to have gone
missing. I had no idea this fabric was so hard to come by now. I only
had a small bit left, so I had to settle with the cookie pattern
oriented in this way. It will still hold what it needs to. You can find the tutorial to make one similar here. The only real change I made besides the size was that I didn't make a square bottom on mine because I wanted it flat for money.
Wednesday, September 11, 2013
arm sling
My 10-year-old daughter broke her forearm on Monday. She has a splint on now and will get a cast next week. She came home from the ER with one of those plain dark blue arm slings, so we decided to fancy things up a bit. She picked out her fabric and the color of bias tape and webbing she wanted and it definitely shows her taste!
For guidance, I referred to this post at Welcome to My Chaos. It was a pretty easy project. I would add, though, that if you are going to pick a directional patterned fabric like the cupcakes, don't forget to make sure the front side is going the way you want. If you cut the sling on the fold on the bottom, the part of the sling facing the body will have a pattern going the opposite direction. I made sure to keep in mind which side was front as I went along. I cut a 7-inch piece of webbing for the female side of the buckle. Sew one side onto the front fabric of the sling, slide the buckle on, then sew the other end to the other side of the sling. I used the rest of the yard of webbing and sewed it on the elbow side of the sling with reinforced stitching (a big box with an 'X' in it). Figure out how the male side of the buckle goes on the strap so that you can adjust it, then "hem" the end of the strap so that it can't be pulled out of the buckle when being adjusted later. Also remember when you're sewing on the bias tape to sandwich the fabric in it so that the wider edge is on the bottom and will be caught in the stitching. You might already realize all of these things, but I know we've all been on autopilot at some point and not thinking about what we were doing and then had to break out the seam ripper. ;) One of the must-haves for her new sling was something to keep the strap from irritating the skin on her neck. I used some of the leftover cupcake fabric and cut a couple of rectangles that when folded in half would be slightly wider than the webbing. I sandwiched them with a layer of batting in the middle, right sides out, and basted the edges. Using some of the green bias tape, I edged the two shorter sides of the rectangle sandwich. I folded the rectangle in half and stiched. Turn it inside out and slide the resulting tube onto the strap. This not only protects the neck, but it makes a place to tuck in the tail of the adjustable strap as well.
Here is my model!
Thursday, August 15, 2013
Happy Birthday!

I realized I forgot to post the annual appliqued birthday shirt picture! Last year they wanted to decorate their own shirts with fabric markers, and the result didn't show up too well in pictures. So this year we went back to the old tradition.
Baby gifts

Made a few things for my best friend's first baby. Used some Minky for a little blanket and some big matching fabric blocks. I used the outline of Georgia for an applique on a onesie. Hope she likes them!
Sunday, January 1, 2012
Disney shirts and ironing board cover
We went on a family vacation to Disney World in December and the kids wanted me to make them a couple of shirts. Between work and getting ready to go, I didn't want to make the shirts from scratch this year, so I got some blank t-shirts at Target and embroidered/appliqued/bedazzled only.


The embroidery and applique patterns were purchased from an Etsy seller who no longer seems to be listed there. If I seem them reappear in the future, I will link them up here.
Another sewing project was from this evening, and that is a new ironing board cover. The ironing board is always out when there is sewing going on, so I decided it was about time to cover that old, stained up cover that was currently on it. I used the tutorial found at Sew Spoiled. It worked out great, was easy, and I think it looks a lot better now. It's a great way to use stash fabric as well.
Before:

After:

Fabric closeup:

The embroidery and applique patterns were purchased from an Etsy seller who no longer seems to be listed there. If I seem them reappear in the future, I will link them up here.
Another sewing project was from this evening, and that is a new ironing board cover. The ironing board is always out when there is sewing going on, so I decided it was about time to cover that old, stained up cover that was currently on it. I used the tutorial found at Sew Spoiled. It worked out great, was easy, and I think it looks a lot better now. It's a great way to use stash fabric as well.
Before:
After:
Fabric closeup:
Sunday, November 27, 2011
Halloween bag and luggage tags
I don't have a picture of the Halloween bag, but I did make one! I basically used the cloth grocery bag pattern that I had made previously, but this time I used skeleton fabric. It made a rockin' Halloween bag that can hold a ton of heavy candy. Always a win as far as my son is concerned.
Today I made a luggage tag that my daughter claimed. We are going on vacation soon and I was looking for a quick and easy project to do on this long Thanksgiving break. This was both. The only trouble I had was not having a teflon foot and sewing on the plastic. It was doable but not perfect and if you look too close you can see I sewed it on a little bit crooked. It serves its purpose, though, and my daughter is pleased so that's all that matters, right?
If you're interested in making one or a few of these, you can find Morah's tutorial here.
This first picture appears cut off on one side when I insert it onto Blogger (click it to see it full-sized at Flickr), but you get the point:
Sunday, August 7, 2011
birthday shirts

It's annual birthday shirt time once again. They picked out their own applique fabric and then I went to work. It's been a long time since I've done it so it felt strange at first!
Subscribe to:
Posts (Atom)

